
In this quick tutorial you'll learn how to draw a Red Knot in 6 easy steps - great for kids and novice artists.
The images above represent how your finished drawing is going to look and the steps involved.
Below are the individual steps - you can click on each one for a High Resolution printable PDF version.
At the bottom you can read some interesting facts about the Red Knot.
Make sure you also check out any of the hundreds of drawing tutorials grouped by category.
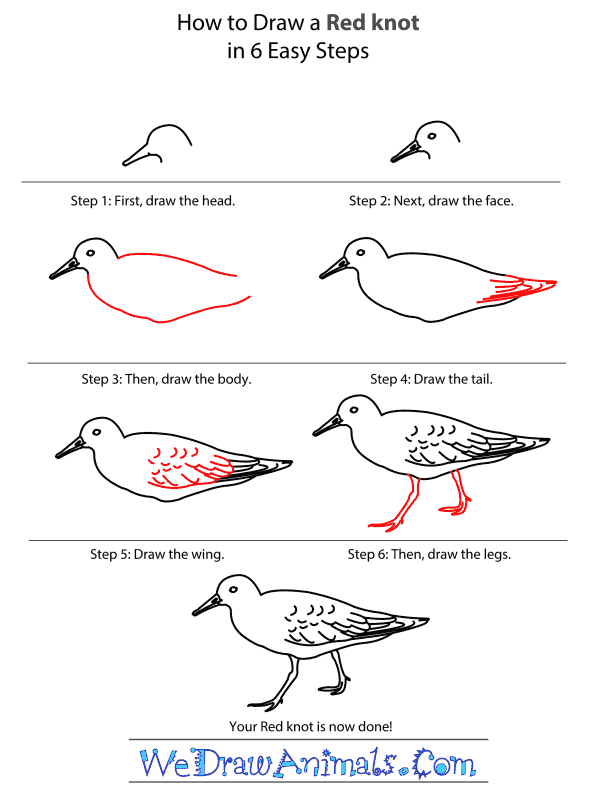
How to Draw a Red Knot - Step-by-Step Tutorial

Step 1: The first step in drawing the red knot is to draw the head. The head is round with a long, pointed beak.

Step 2: The next step is to draw the details of the face and beak. The eye is an oval shape that is in the middle of the head.

Step 3: Then, draw the body with an orange chest but leave space for the tail.

Step 4: Next, draw the tail with the feather detail. The tail should be small and pointed.

Step 5: The next step is to draw the wing with brown and white detail.

Step 6: The last step is to draw the legs. The legs are longer with joints close to the body.
Interesting Facts about the Red Knot
Medium-sized shorebirds Red Knots spend much of their time in tundra environments in the far north of Europe, Canada, and Russia. It’s the second largest member of its genus after the great knot. The Red Knot gets its name from its red-orange body with black feathers along its top, it has a long thin bill used for foraging prey.
Did you know?
- North American Red Knots migrate to coastal Europe and South America while Eurasian Red Knots migrate to winter in Africa, Papua New Guinea, Australia, and New Zealand.
- When not breeding Red Knots move in giant flocks.
- Red Knots have one of the longest migrations of any bird, traveling 9,000 miles.
- Red Knot’s can have a massive feeding range of up to 310 sq mi. or 800 km2.
- Red Knot’s colors change based on whether its breeding season or not.
Lesson plan note: The Red Knot travels huge distances while migrating. To help students understand how big that range is take them to the largest area available and set up flags on opposite sides. Have students run from side of the other imagining they are going from the Arctic to South America.
How to Draw a Red Knot – Step-by-Step Tutorial