

Step 1: Draw half a circle with an indent at the bottom and the top open for the base of your wood mouse's head. Add two rounded triangles at the top for ears.

Step 2: Draw two eyes, a nose, and whiskers.

Step 3: Add a rounded shape for the body behind the head. Leave the bottom open so we can draw legs.

Step 4: Now add the short front legs and toes.

Step 5: Draw one hind leg in the back. It looks like the front legs.

Step 6: Add a long, skinny tail and you are finished with your wood mouse! These mice are brown with black eyes with pink fingers and nose.
Interesting Facts about the Wood Mouse
Found all across Europe, parts of northwestern Africa, and Mediterranean islands the Wood Mouse is one of the most common rodents you can find. They are sometimes called the Long-tailed Field Mouse and stand out from other local rodents with their golden-brown fur. They gather huge food stores during the autumn to live on during the winter in large underground burrows. They are nocturnal, foraging for food at night.
Did you know?
- Wood Mouse burrows can include food stores, nest chambers, and more and can be used by one generation after the next.
- During the winter large numbers of Field Mice will nest together but nest by themselves during the spring
- Wood Mice are major part of the Tawny Owls diet, failing to breed when Wood Mouse numbers are low.
- The Wood Mouse doesn’t eat the flesh of fruit, they only eat the pips inside.
- Wood Mice are able to reproduce at just two months old or when they weigh 12 grams.
Lesson plan note: Wood Mice use everything from twigs and moss to leaves and stones to make their nests with multiple areas. Gather natural materials like these and enough old boxes for each student, then have them construct their own version of a Wood Mouse burrow. This will give them a look at how the Field Mouse lives.
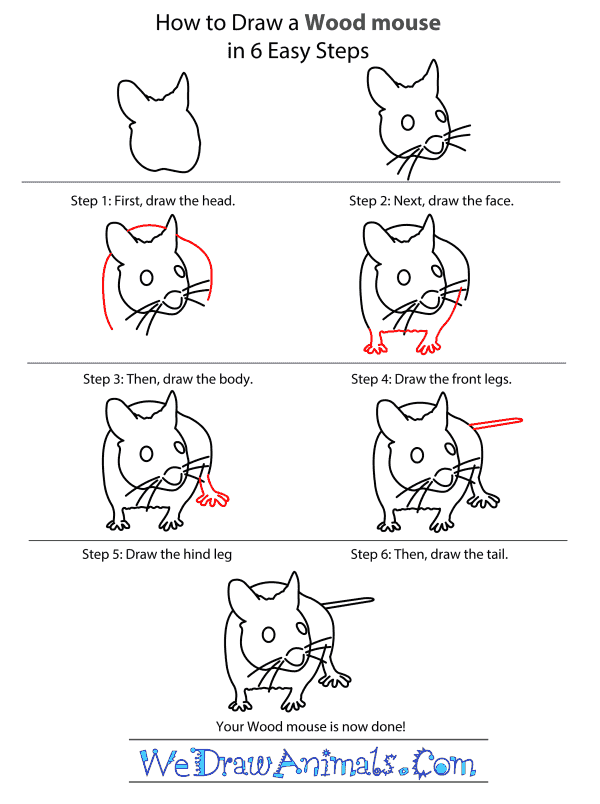
How to Draw a Wood Mouse – Step-by-Step Tutorial