
In this quick tutorial you'll learn how to draw a Clownfish in 5 easy steps - great for kids and novice artists.
The images above represent how your finished drawing is going to look and the steps involved.
Below are the individual steps - you can click on each one for a High Resolution printable PDF version.
At the bottom you can read some interesting facts about the Clownfish.
Make sure you also check out any of the hundreds of drawing tutorials grouped by category.
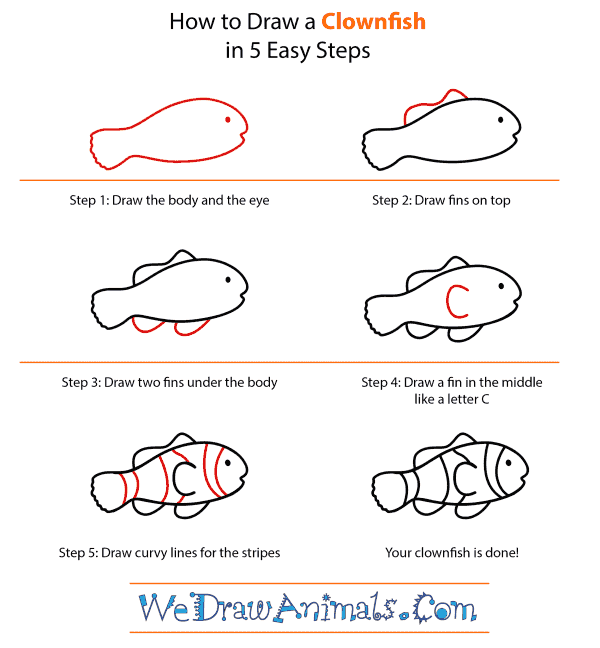
How to Draw a Clownfish - Step-by-Step Tutorial

Step 1: To start, draw the body in a standard fish shape and include the eye.

Step 2: Draw two small, connected fins on top.

Step 3: Now draw two entirely separated fins on the lower part of the body.

Step 4: Add a fin in the middle of the body, in the shape of the letter "C".

Step 5: Draw a series of curving lines for the fish's stripes and you're done!
Interesting Facts about the Clownfish
Clownfish are made up of twenty-eight different subspecies which reside in the Pacific ocean, Red Sea, Indian Ocean, and the Great Barrier Reef. They enjoy the warm water near coral reefs – however due to pollution, their habitats are dying out. Then there is also the overfishing issue – but they have not been put onto the Endangered Species List. They are easily recognized by their colorful bodies and white stripes down their sides.
Did you know?
- Clownfish gained worldwide fame after being in “Finding Nemo”
- They are also known as “Anemonefish” because they usually home with sea anemones
- The relationship between a Clownfish and a Anemone is called a “Symbiosis”
- They receive nourishment from algae, plankton, and dead anemone tentacles
- Clownfish are territorial and defend their home
Lesson Plan Idea – Have a movie day – watch Finding Nemo. Have children research Clownfish and compare their findings to the movie. How true to life was Finding Nemo?
How to Draw a Clownfish – Step-by-Step Tutorial