
In this quick tutorial you'll learn how to draw a Golden Eagle in 8 easy steps - great for kids and novice artists.
The images above represent how your finished drawing is going to look and the steps involved.
Below are the individual steps - you can click on each one for a High Resolution printable PDF version.
At the bottom you can read some interesting facts about the Golden Eagle.
Make sure you also check out any of the hundreds of drawing tutorials grouped by category.
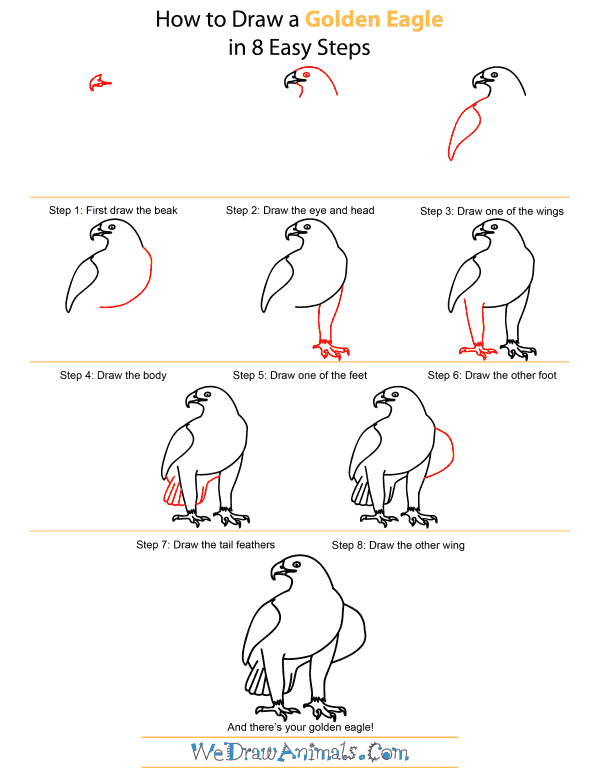
How to Draw a Golden Eagle - Step-by-Step Tutorial

Step 1: Start drawing your Golden Eagle by making the beak. Think of the beak as a big triangle with curved sides, that all curve down and to the left. Then draw a line beneath that to make the lower jaw of the mouth. Put in a dot in the center near the back of the top beak to make the nostril.

Step 2: Now draw the head! This is done with two curved lines, one starting at the top of the beak, the other at the bottom. Both should curve down, but the bottom line should curve to the left after going right for a moment.

Step 3: Now draw the left wing. Do this with two lines, one starting at the neck and curving down and to the left This line should end at a tip, where it curves up and to the right sharply, to curve towards the right more concertedly, before bending back to the left to meet the first line near the top.

Step 4: Now draw chest and body by making a large curving line that starts just below the right side of the neck, bends to the right, before bending to the left.

Step 5: Let's make the leg. To do so, draw two lines on the right side of its body that start a little far apart, going down. As they go down they should get a bit closer, before meeting with a jagged line at the bottom, to imply feathers. Then draw three prongs at the bottom of the leg to make the toes, with curved points to make the claws.

Step 6: The same lines are used for the left leg. Two lines that start far apart, filling in most of the gap that remains between the body and the wing. They should start far apart, and get slightly closer together, ending at the bottom with a jagged line. Three prongs for the toes, and curved points to make the claws, and you're done with the legs!

Step 7: Now for the tail feathers. Each feather is a simple looping line that goes down, curving around, then up. Simply make several looping lines that are next to each other to make them.

Step 8: Now for the right wing. IT is a simple curve that starts at its right 'shoulder' going right, before curving down, then curving left. And there you have it, your eagle is finished!
Interesting Facts about Golden Eagles
Golden eagles are one of North America’s largest birds of prey (birds that hunt for food while flying). Their names come from the fact that they have golden brown feathers around their head and neck. The rest of their plumage is dark brown.
Did You Know?
- The golden eagle is Mexico’s national bird, and it is featured on the country’s flag.
- In order to catch their prey, golden eagles can sweep down to their ground at a speed as fast as 150 miles per hour. Their prey includes reptiles, other birds, large insects, rabbits, and fish.
- Golden eagles live in Mexico and the western region of the United States, including Alaska. Golden eagles also live in Canada, Asia, Europe, and northern Africa.
- The wingspan of an adult golden eagle is 6 and 7.5 feet.
- Some golden eagles migrate south for winter, while others live in the same region year-round.
Gazelles sometimes mate for life, or they remain with one mate for several years. Female golden eagles usually lay one to four eggs at a time. The male and female take turns incubating the eggs. This means that they sit over them to keep them warm. After the eggs hatch, the babies usually stay in the nest where they were laid for three months.
How To Draw A Golden Eagle – Step-by-Step Tutorial