
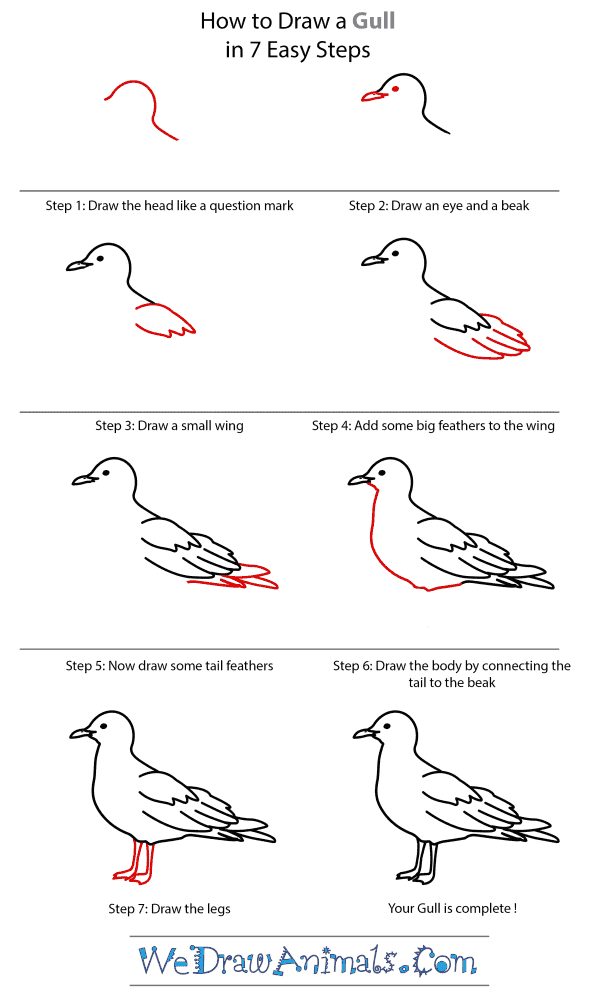
In this quick tutorial you'll learn how to draw a Gull in 7 easy steps - great for kids and novice artists.
The images above represent how your finished drawing is going to look and the steps involved.
Below are the individual steps - you can click on each one for a High Resolution printable PDF version.
At the bottom you can read some interesting facts about the Gull.
Make sure you also check out any of the hundreds of drawing tutorials grouped by category.
How to Draw a Gull - Step-by-Step Tutorial

Step 1: To begin drawing the head, make a shape similar to a sideways question mark.

Step 2: Add a small beak and the eye.

Step 3: Draw in a small wing that sticks out from the back of the bird's neck.

Step 4: Add some very large feathers to the same wing that you just drew.

Step 5: Now, add some shorter tail feathers.

Step 6: Using a long, curved line, connect the tail to the beak to create the rest of the body.

Step 7: Draw two thin legs that end with flat feet and you're done.
Interesting Facts about the Gull
This particular Gull (larus canus) is not as common as other gulls, as it is smaller, has a thinner bill, and a rounded head. They mainly eat earthworms so they are often found in recently ploughed farm fields. They often found in garbage dumps ravaging for food in the winter months. Nests are built on the ground, in lower trees and near water. Mated pairs produce three to five eggs during a mating season
Did you know?
- Lifespans can reach up to twenty-four years
- Eggs are incubated for twenty-eight days
- This Gull mainly breed in Scotland
- Breeding occurs on cliffs, locks, lakes, and marshes
- Is classified as “Least Concern” on the Endangered Species list
Lesson Plan Idea – Have your class divide into groups and assign them each a different variety of Gull to create a report about. Present them to class. Then have a group discussion about what the differences are between all of the Gull varieties researched.
How to Draw a Gull – Step-by-Step Tutorial