
In this quick tutorial you'll learn how to draw a Mussel in 5 easy steps - great for kids and novice artists.
The images above represent how your finished drawing is going to look and the steps involved.
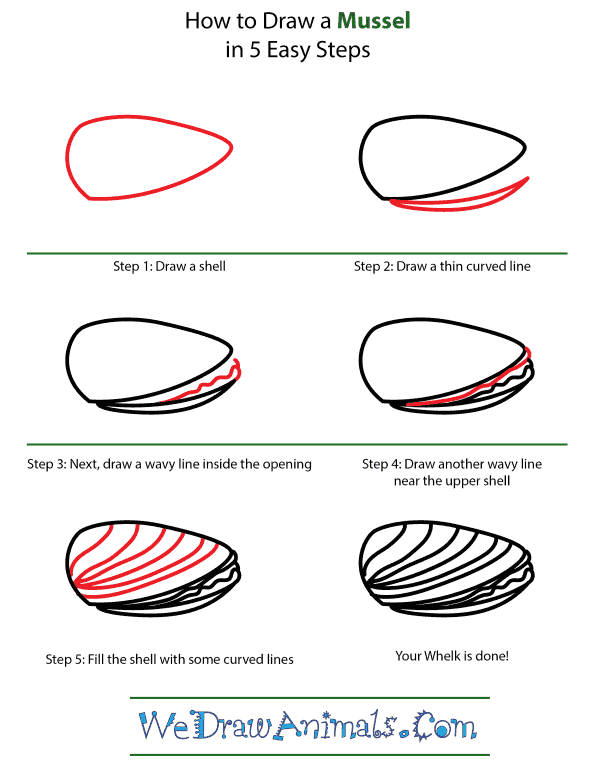
Below are the individual steps - you can click on each one for a High Resolution printable PDF version.
At the bottom you can read some interesting facts about the Mussel.
Make sure you also check out any of the hundreds of drawing tutorials grouped by category.
How to Draw a Mussel - Step-by-Step Tutorial

Step 1: First, you will draw a shell that looks vaguely like a triangle turned on its side.

Step 2: Add a thin, curved line beneath the shell.

Step 3: Draw a wavy line inside the opening created when you drew the two sides of the shell.

Step 4: Add another wavy line near the lip of the upper shell.

Step 5: Fill in the shell's design with numerous curved lines, and your drawing is complete.
Interesting Facts about the Mussel
For over two thousand years the Mussel has been used as a food source. The most common Mussel is the Blue Mussel, which can be found in Britain and Scotland. They attach themselves to rocks with chitinous threads that keep them attached to said rock in the seawater. To survive harsh elements, the Mussel can seal itself not letting anything in. Water, however, is trapped inside of it when it happens.
Did you know?
- In Europe alone – mussels have been cultivated for eight hundred years
- Diet consist exclusively of plankton
- Can filter sixty-five liters of water per day
- They are nutritious and low on salt.
- One ounce of Mussel meat contains more protein than beef stock
Lesson Plan Idea – Have children research how long a Mussel can live. Using that as a base, figure out how much plankton could be in a liter of water (approx.) and try to discover how much plankton a mussel could eat in a lifetime.
How to Draw a Mussel – Step-by-Step Tutorial