
In this quick tutorial you'll learn how to draw a Mynah in 6 easy steps - great for kids and novice artists.
The images above represent how your finished drawing is going to look and the steps involved.
Below are the individual steps - you can click on each one for a High Resolution printable PDF version.
At the bottom you can read some interesting facts about the Mynah.
Make sure you also check out any of the hundreds of drawing tutorials grouped by category.
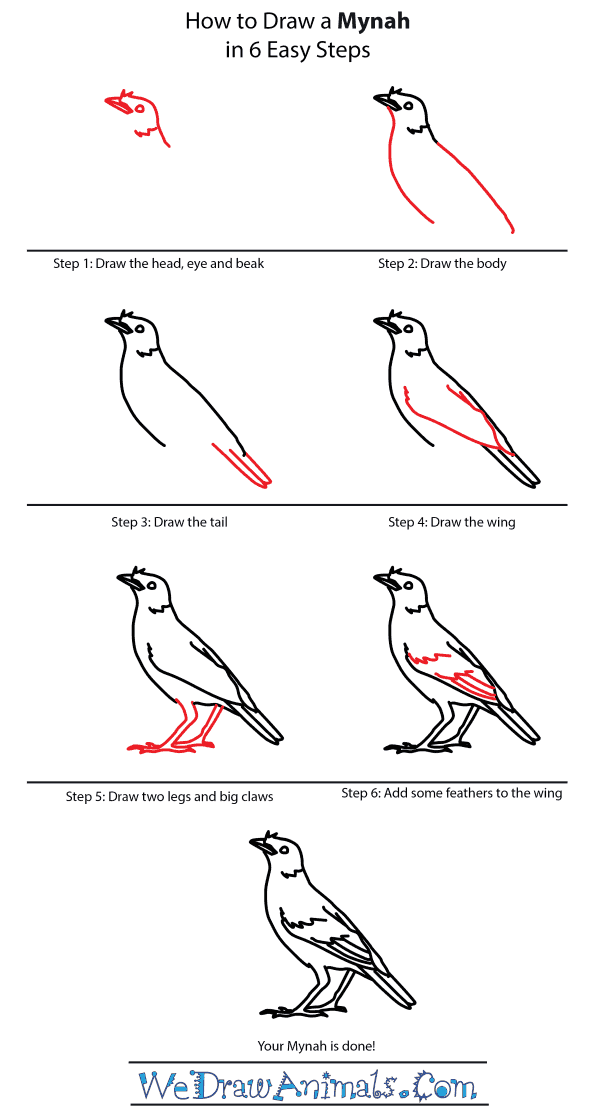
How to Draw a Mynah - Step-by-Step Tutorial

Step 1: Begin by drawing a small, pointed head that leads down into the neck. Add the beak and eye.

Step 2: Draw the body extending from both sides of the head with long, slightly curved lines.

Step 3: Add the tail to the bottom of the body, making two feathery shapes.

Step 4: Now add the wing to the side of the body.

Step 5: At the bottom of the body, draw two bent legs that have long claws on the feet.

Step 6: Add detailed feathers to the wings, and you're all done!
Interesting Facts about the Mynah
Mynahs originated throughout all of Asia, but was deliberately introduced to New Zealand and Australia in the nineteenth century in order to wipe out some ornery pests. However, the Mynah adapted to this new area and now it is the new notorious pest in Australia. They live in open fields, woodlands, and grasslands – but they have also been seen in parks and gardens.
Did you know?
- Mynahs belong to the Starling Family of birds
- Nothing is currently threatening the Mynah population
- Diet includes snails, fruit, small insects, seeds, and frogs
- They prefer to feed in groups – which leads to damage to wherever they are eating
- Mynah are usually in large flocks of one thousand birds
Lesson Plan Idea – Since Mynahs are now the pest of Australia, what can be done to fix this problem? Did they fix the problem they were sent there for to begin with? Discuss.
How to Draw a Mynah – Step-by-Step Tutorial