
In this quick tutorial you'll learn how to draw a Whelk in 5 easy steps - great for kids and novice artists.
The images above represent how your finished drawing is going to look and the steps involved.
Below are the individual steps - you can click on each one for a High Resolution printable PDF version.
At the bottom you can read some interesting facts about the Whelk.
Make sure you also check out any of the hundreds of drawing tutorials grouped by category.
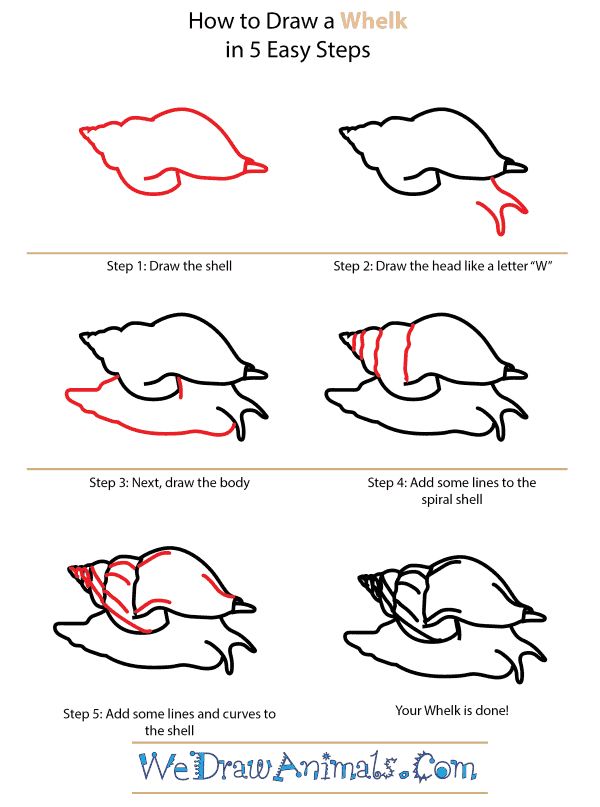
How to Draw a Whelk - Step-by-Step Tutorial

Step 1: Draw the shell, using irregular lines and many points.

Step 2: Near the front of the shell, draw a head that resembles the letter "W."

Step 3: Draw the body that connects the head to the shell.

Step 4: Add a few lines to the spiral shell.

Step 5: Draw some more lines as detail on the whelk's shell, and your design is finished.
Interesting Facts about the Whelk
Whelks are short with a yellow, brown shell that also have lighter and darker spiral areas. In total, it has seven or eight “whorls” (spirals) and a large opening that tapers off to a point. When searching for food, the Whelk extends a “siphon” which funnels water to its gills. It is also used to smell its prey. Breeding occurs October to May – during which up to one thousand eggs are attached to rocks.
Did you know?
- They are considered gastropods
- They are carnivorous
- Diet consist of mollusk and polychaete worms
- Only part of the eggs laid will become fully developed
- Can live up to ten years in the wild
Lesson Plan Idea – Using a poster board (or several) let kids glue pom poms to it to represent the Whelk eggs. Showing exactly how many eggs a female lays during a breeding season.You could also turn this into a math lesson – if only one hundred eggs developed fully, what fraction of the eggs survived? (Example)
How to Draw a Whelk – Step-by-Step Tutorial