
In this quick tutorial you'll learn how to draw a Woodlouse in 5 easy steps - great for kids and novice artists.
The images above represent how your finished drawing is going to look and the steps involved.
Below are the individual steps - you can click on each one for a High Resolution printable PDF version.
At the bottom you can read some interesting facts about the Woodlouse.
Make sure you also check out any of the hundreds of drawing tutorials grouped by category.
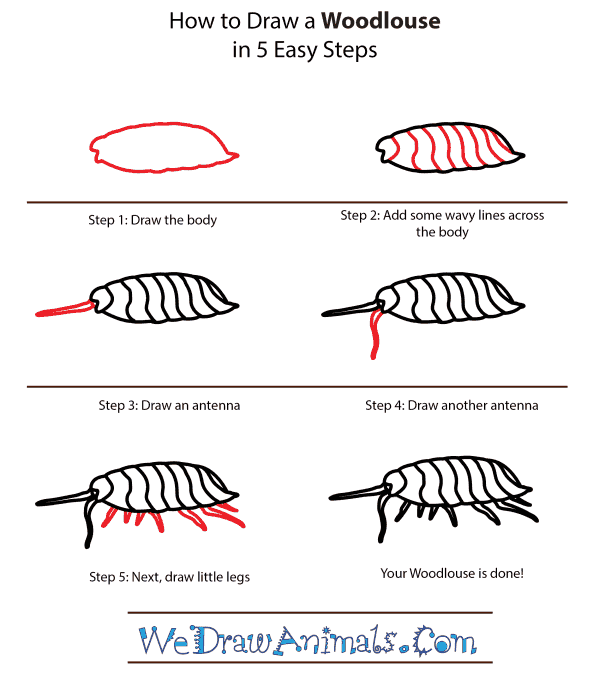
How to Draw a Woodlouse - Step-by-Step Tutorial

Step 1: Draw the shape of the body, which is a long fairly oval shape with irregular lines.

Step 2: Draw vertical lines throughout the body of the woodlouse to separate it into sections

Step 3: Draw one long, pointed antennae out of the head.

Step 4: Add the second antennae.

Step 5: Finish your drawing of the woodlouse by adding many tiny little legs to the bottom of the woodlouse.
Interesting Facts about the Woodlouse
The Woodlouse is another Crustacean relative of lobster and crab. They have a very tough exoskeleton that Is molted off every two months to help with growth. There are two phases to the molt. Habitats include very dark and wet places in areas near the shore. They are a pest because they eat young seedlings but are considered life savers due to eating decaying plant material.
Did you know?
- Thirty-five hundred species of Woodlouse exist
- They have fourteen legs
- Woodlouses fertilize the land and dirt
- Only reach one point one inches long
- They are nocturnal
Lesson Plan Idea – Study the eating habits of the Woodlouse. What is it that they do during this time that fertilizes the land? How much of an area do they fertilze?
How to Draw a Woodlouse – Step-by-Step Tutorial