
In this quick tutorial you'll learn how to draw a Five Lined Skink in 5 easy steps - great for kids and novice artists.
The images above represent how your finished drawing is going to look and the steps involved.
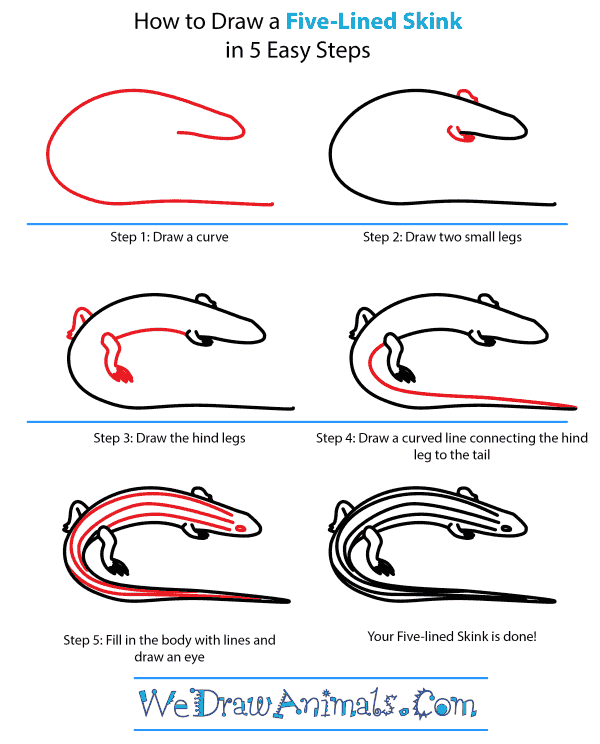
Below are the individual steps - you can click on each one for a High Resolution printable PDF version.
At the bottom you can read some interesting facts about the Five Lined Skink.
Make sure you also check out any of the hundreds of drawing tutorials grouped by category.
How to Draw a Five Lined Skink - Step-by-Step Tutorial

Step 1: Illustrate the shape of the body with a long curved line that slightly resembles the letter "C".

Step 2: Draw two small legs at the front of the body.

Step 3: Add a curved belly, and then the two hind legs.

Step 4: Connect the curve that you made for the belly to the curve for the tail, making one long tail.

Step 5: Detail the skink by adding long lines to the length of its body.
Interesting Facts about the Five-Lined Skink
The Five Lined Skink received its name for the five yellow, white lines that run down the entire length of its body. If that is not odd enough for you, Skink young have bright blue tails, but this fades with age. However, when breeding season rolls around, an orange patch appears on the male’s chin. If attacked by a predator, the Skink’s tail can break off, allowing them to escape from harm. The Five Linked Skink hibernates from October through May.
Did you know?
- It must be almost thirty-four degrees Celsius before the Skink will come out of hibernation
- They have been known to eat berries in captivity
- Females lay thirteen eggs during a mating season
- Diet includes invertebrates – with large males eating lizards and mice
- Habitats include woodlands and open areas where they can bask in the sun
Lesson Plan Idea – Have Skink drawings available – allow children to color in their own versions a male, female, and baby Skink.
How to Draw a Five-Lined Skink – Step-by-Step Tutorial