
In this quick tutorial you'll learn how to draw a Genet in 7 easy steps - great for kids and novice artists.
The images above represent how your finished drawing is going to look and the steps involved.
Below are the individual steps - you can click on each one for a High Resolution printable PDF version.
At the bottom you can read some interesting facts about the Genet.
Make sure you also check out any of the hundreds of drawing tutorials grouped by category.
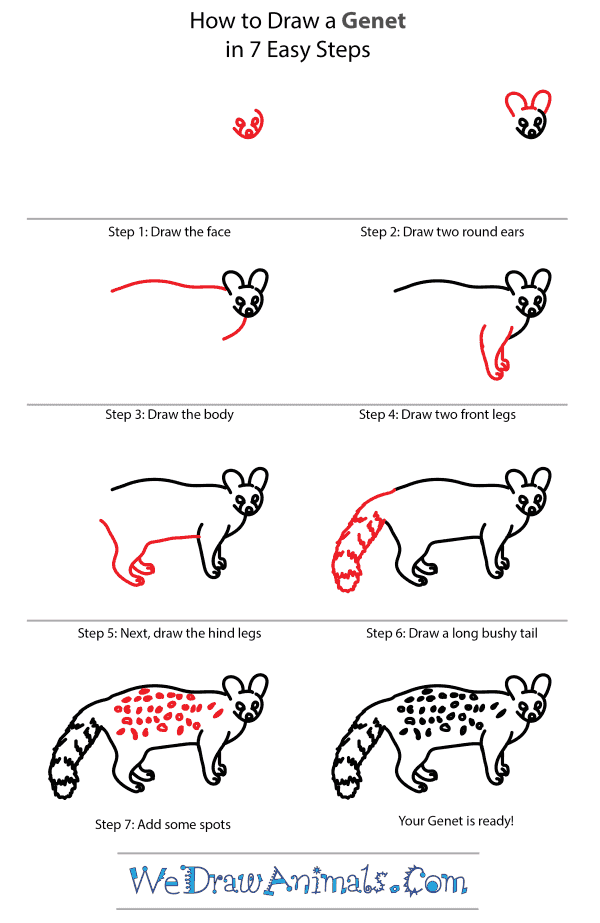
How to Draw a Genet - Step-by-Step Tutorial

Step 1: Draw a small, circular face with large eyes and a nose.

Step 2: Add two round ears to the top of the head.

Step 3: Draw a long flat line for the top of the body, and a curved line at the front for the chest.

Step 4: Now draw two front legs, which will be wider at the top and taper down to small feet.

Step 5: Draw the belly, and add the two hind legs in the same fashion that you drew the first ones.

Step 6: Now add a long, bushy tail.

Step 7: Finish your drawing by adding spots to the body of the genet.
Interesting Facts about the Genet
Made up of almost thirty different sub species, the Genet is found in the Middle East, Africa, and Europe. Habitats include marshes, hillsides, farm lands, and forests but, there is still a threat of habitat loss. They are not endangered and they are still very common in the wild. They have retractable claws on all four feet which they use to catch their food. As carnivores, Genet’s eat birds, mice, insects, and lizards.
Did you know?
- Belongs to the Civet family
- They have a mane that goes from shoulders to tail along
- Genets are solitary with territories as large are three miles
- Mating season occurs January through September
- Can live eight years in the wild and thirteen in captivity
Lesson Plan Idea – Have children create their own Genet – with its yellowish body and black spots. Allow children to display them in the classroom
How to Draw a Genet – Step-by-Step Tutorial