
In this quick tutorial you'll learn how to draw a Wasp in 7 easy steps - great for kids and novice artists.
The images above represent how your finished drawing is going to look and the steps involved.
Below are the individual steps - you can click on each one for a High Resolution printable PDF version.
At the bottom you can read some interesting facts about the Wasp.
Make sure you also check out any of the hundreds of drawing tutorials grouped by category.
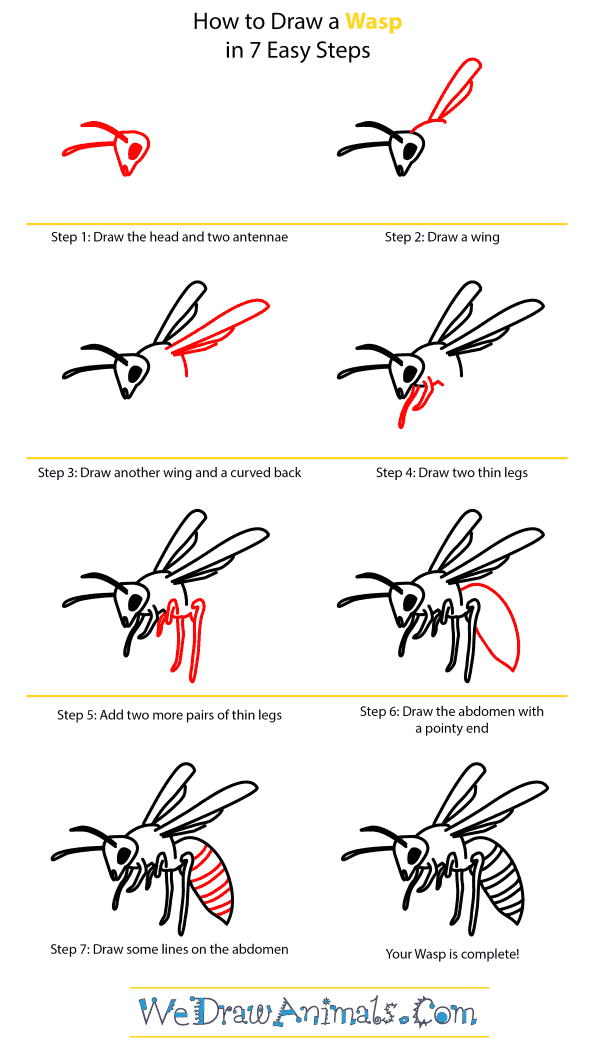
How to Draw a Wasp - Step-by-Step Tutorial

Step 1: Begin by drawing a small triangular head with large eyes and two antennae sticking out of the top.

Step 2: Draw a small line for the back, and then add a long wing that angles upward.

Step 3: Add a second wing, and continue the line for the curvature of the back.

Step 4: Now draw two thin legs extending out from the front of the body.

Step 5: Add two more pairs of thin legs.

Step 6: Now draw the abdomen, making sure that it ends with a point.

Step 7: Draw some lines on the abdomen and your drawing of the wasp is complete!
Interesting Facts about the Wasp
While they can be helpful in gardens, wasp are most commonly considered a nuisance. Wasp venom contains a pheromone that causes the other wasps to grow angrier than what they were to begin with. (So try not to get the whole nest angry) If you are stung however, the sting should be gone within twenty-four hours. Wasps do not fly, or attack, in swarms.
Did you know?
- Male wasps are called Drones
- The only wasps that survive the winter are the fertilized queens
- In spring, the fertilized queens emerge to go off and build their own nests
- A wasp sting can be treated with deodorant that contains aluminum
- Wasps feed their young (larvae) meat
Lesson Plan Idea – As a class, come up with a lifecycle of the wasp. Every from Larvae to Queen. Have children help create a poster(s) explaining this and display it in the classroom.
How to Draw a Wasp – Step-by-Step Tutorial