
In this quick tutorial you'll learn how to draw an Orangutan in 9 easy steps - great for kids and novice artists.
The images above represent how your finished drawing is going to look and the steps involved.
Below are the individual steps - you can click on each one for a High Resolution printable PDF version.
At the bottom you can read some interesting facts about the Orangutan.
Make sure you also check out any of the hundreds of drawing tutorials grouped by category.
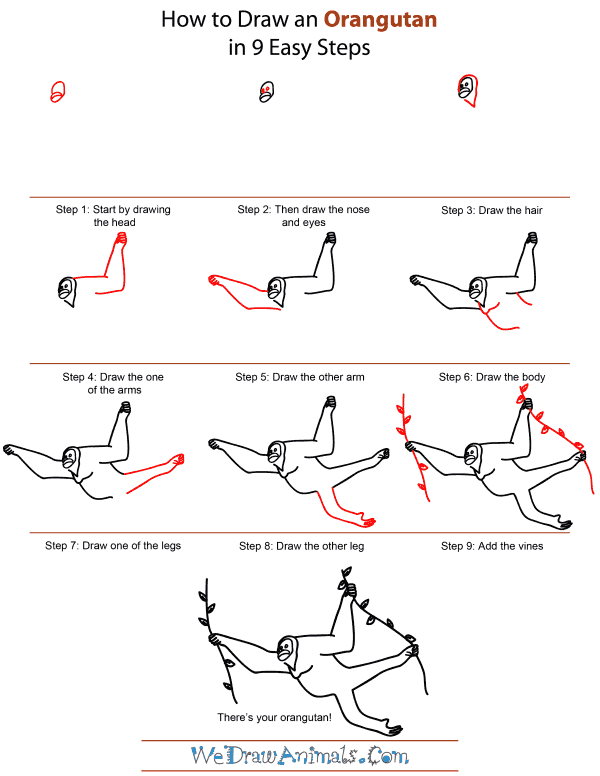
How to Draw an Orangutan - Step-by-Step Tutorial

Step 1: Make the head with a half oval with flat edges. Make an oval at the bottom of that first shape with a curved line going through it to make the mouth and lips.

Step 2: Add two circles for the eyes above the mouth.

Step 3: Make a teardrop shape to make the hair around the Orangutan's face. The point of the teardrop should be pointing down and only slightly to the back.

Step 4: Make the first arm by drawing a horizontal line going back from the top of the head. A slanted line should go up from there, into a series of four clenched fingers. Each finger is just a shot rectangle with rounded ends. Make a small line to the bottom left of the fingers to make the thumb. Draw the back of the hand by making a line to slants to the left and down shortly, before curving down and to the right. Put in a round elbow and a horizontal line for the bottom of the arm.

Step 5: Draw the next arm by making a line that start horizontal, before curving up and to the left. Make the hand by creating a curved line, with several lines within it that go up and to the right. The next line should slant down and to the right, before curving up to a horizontal line, ending just below the hair you draw before.

Step 6: Now for his chest and belly! Make a line that curves down from the hair, to the arm you've drawn before. After that it should curve up, and make a bump before ending in another slight curve. The next line should start at the front bottom of the chest, and curve down and to the back to make the belly. Add another curving line below the right arm to make the back.

Step 7: Draw a line that goes from the back to make the top of the leg, slanting upwards. It should curve up and around to make the foot. Draw lines in the curve to make the toes! The line then should curve down and slant to the left.

Step 8: Connect the belly and and the rear leg with two lines that go down, and curve back. At the end should be a hand-like shape, with four fingers and thumb.

Step 9: Put in two thin vines with leaves for the Orangutan to hold onto, and you're done!
Interesting Facts about Orangutans
Orangutans are apes that have reddish hair. They are found in the Asian tropical rainforests of Borneo and Sumatra.
Did You Know?
- Orangutans are arboreal, which means that they spend most of their lives in trees.
- Adult male orangutans can weigh as much as 220 pounds. Adult females weigh about half of that.
- Orangutans are the largest of all arboreal animals.
- When orangutans are on the ground, they walk on all four limbs.
- Orangutans eat mostly fruit. They also dine on bark, nuts, and plants.
- Trees in the rainforests where they live are getting cut down, and orangutans are running out of places to live in the wild. They are now an endangered species.
Orangutans are able to swing from tree to tree thanks to their hook-like hands and feet and their long arms. To get from tree to tree, they grasp the branches with their legs or arms and swing their bodies to get to the other tree. This same motion is how people get from one bar to the next on the monkey bars. But don’t get confused – orangutans are not monkeys! The difference between apes and monkeys is that monkeys have tails, apes do not.
How To Draw An Orangutan – Step-by-Step Tutorial